


02. Brown Butter & Spelt Cherry Pie
The follow up to '01. Butter'

Hello!
Welcome to my Roll with it Newsletter. I’m happy you found me!
This is a follow up to the article '01. Butter’ because damn I just had TOO MUCH to say and not enough space! I highly recommend checking that out before we deep dive into a butter recipe below.
Ok, let’s get going.
Cissy… xo
Every day of March started with glorious sunshine and ended up in a downpour. I don’t know about you but those heavy clouds sit on my head and I find it hard to tap into a creative flow. So much so that for weeks I was chasing my tail trying to recipe test a shortbread biscuit, which I thought would be a great accompaniment to this roundup on butter. Oh boy, was I wrong! I tested all sorts; different shapes, sizes, flours, sugars, inclusions such as nuts and chocolate, only to find myself thinking ‘meh’ every time I bit into one. Don’t get me wrong, they were delicious and I ate them all but something just wasn’t vibing with me. Then I remembered that, for me, shortbread is the side piece to the main event. Pair it with a voluptuous bowl of strawberries and whipped cream, or use it as a spoon to scoop up a rich, airy chocolate mousse or as a dunking biscuit into a cup of Yorkshire tea, then you’ve got me and I’m here for it! Anyway, the real moral of the story is, I was trying to force something that wasn’t working and that’s the whole freakin’ point of this newsletter! So, I’ve parked the shortie for now and will revisit it in the future.
Brown Butter & Spelt Pie Dough
Instead, I decided to make pie dough (or flaky). Pies are amazing vessels for holding any number of delicious fillings. Once you have a bottom crust you can fill it with whatever you want; fruit, curd, chocolate, meat, you name it. The same goes for the top; crumble, a dough lid, torched meringue, or leave it open. It also has sisters in the form of galettes, jalousie and hand pies. It's versatile AF and we love it!
Pie dough is similar to shortbread in that we can follow a 3:2:1 ratio, for flour to fat to liquid. It is also similar in that it has very few ingredients but how we handle them is truly the key.
For a super buttery, flaky pie dough we want to gently rub the butter and flour together before adding in liquid to hydrate and bind it. We want to use COLD ingredients (and work quickly) so that the butter in the dough doesn’t melt and the gluten in the flour isn’t overdeveloped. This is crucial for getting that tender, flaky crust. This is because when the butter melts in the oven it evaporates and this steam gets trapped, creating those lovely layers we see.
Before making my pie I decided to do a lil bit of recipe testing. I was on a brown butter buzz from my shortbread trials and I had some surplus lurking in the fridge, so I thought, ‘how can I incorporate brown butter into my dough and why haven’t I done it before?’ Well, firstly it’s important to note that when we brown butter we have to evaporate off all the liquid in it (which we know is about 15%) before the milk solids can brown. With this in mind, our brown butter won’t be contributing to the hydration of our dough in the same way that regular butter would. So we need to equate that lost liquid another way, especially since we need that moisture in our dough to create those layers. I also wanted to incorporate spelt flour to compliment and promote the nutty flavour profile of brown butter. Spelt is quite low in gluten, which works in our favour for this application, but it needs more liquid to hydrate. So now we’re working with 2 ingredients that are on the drier side of things, alongside sugar which is hygroscopic (pulls water from the flour proteins). Hmm… this is sounding like one thirsty dough!
My first trials began by following my regular pie dough recipe but using blends of plain flour and spelt with either regular butter or brown butter, plus a dough hydrated with yoghurt (we’ll get onto this another time).
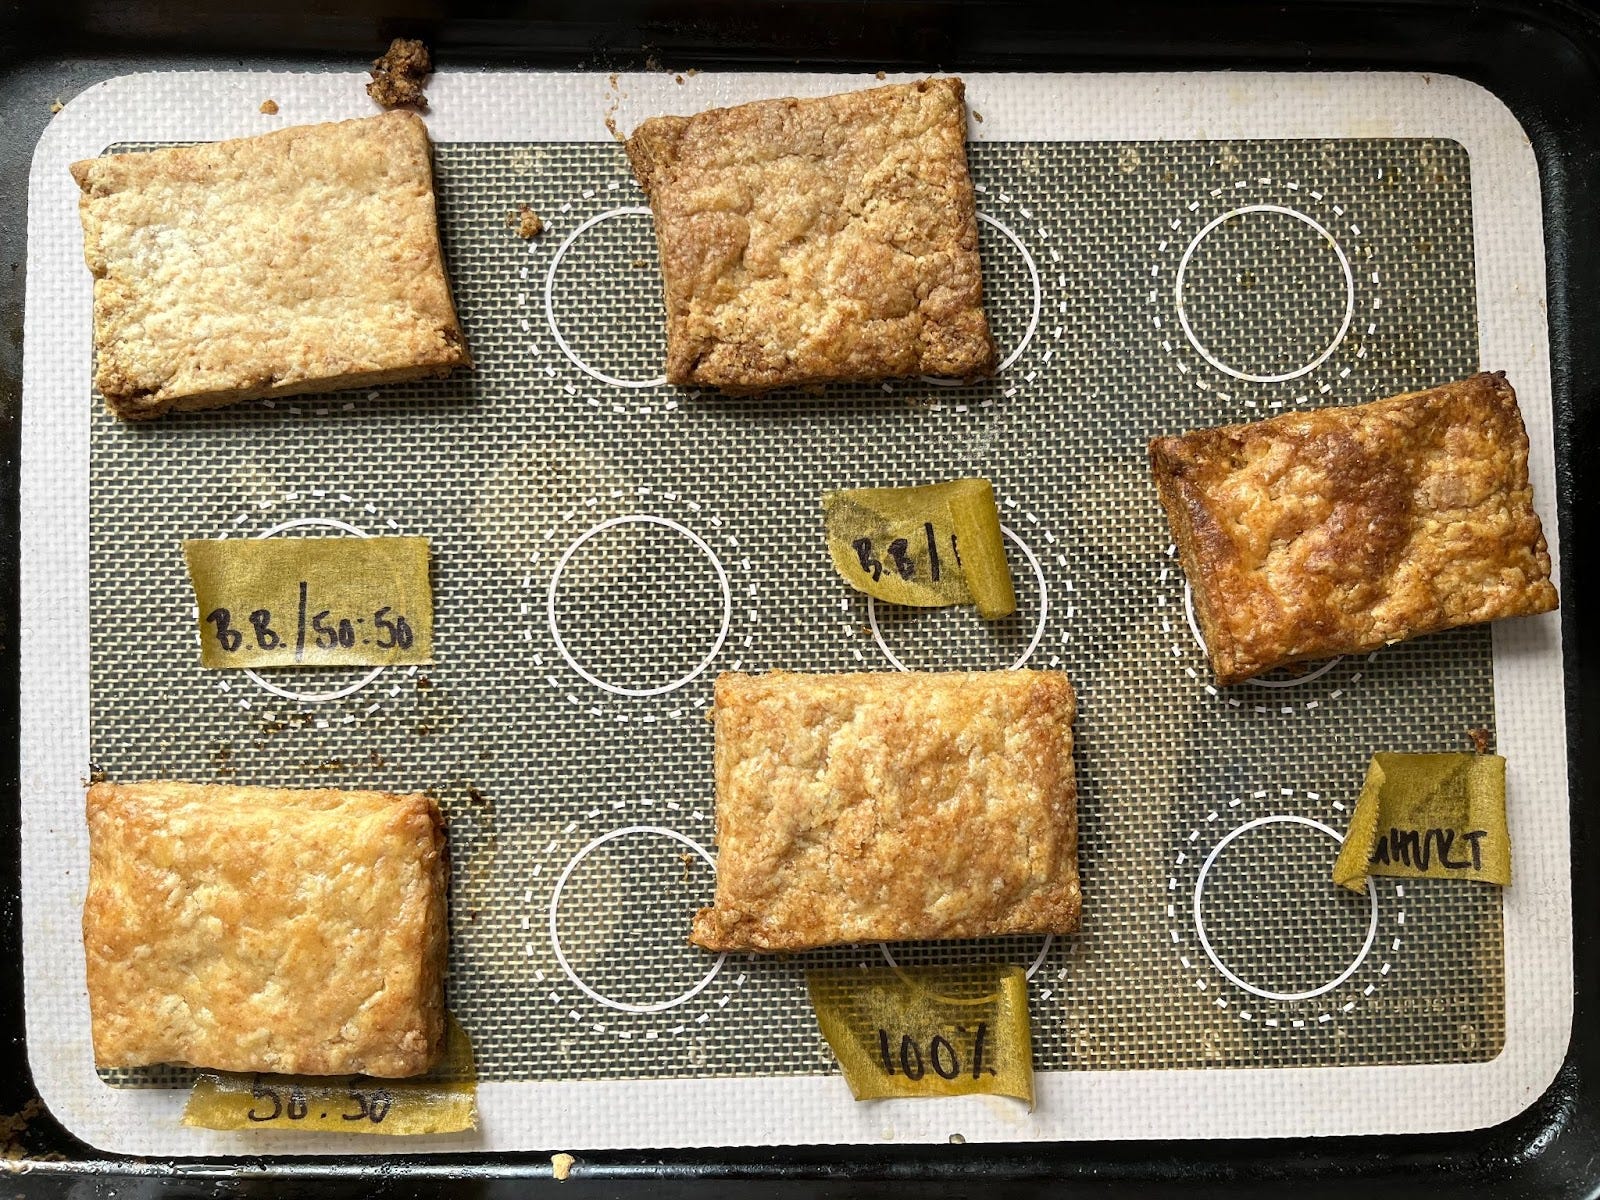
From this image you can see how each dough varies in colour and texture. The darker doughs have a higher % of wholegrain whilst the yoghurt dough also has a higher % of sugar which has contributed to the increased browning (Maillard reaction). The bumpy textured doughs suggest they are under hydrated. Other notes of each dough are as follows:
brown butter, 50% spelt, 50% plain flour: delicious, nutty, shortbread texture, needs more liquid
brown butter, 100% spelt: crisp, delicate, dry during the mix, needs more liquid
butter, 50% spelt, 50% plain flour: very flaky, very earthy
butter and 100% spelt: a little oily, chewy texture
brown butter, 100% spelt and yoghurt: very dark, tangy
Using a baker’s formula (where the ingredients are relative to the total weight of flour, which is represented as 100%), I decided to go with the brown butter dough with a 80:30 spelt to plain flour ratio and an increased hydration from 31% to 46%. During this test I also wanted to see whether there was any difference when I laminated (folding the dough over again to create more layers) vs when I didn’t.
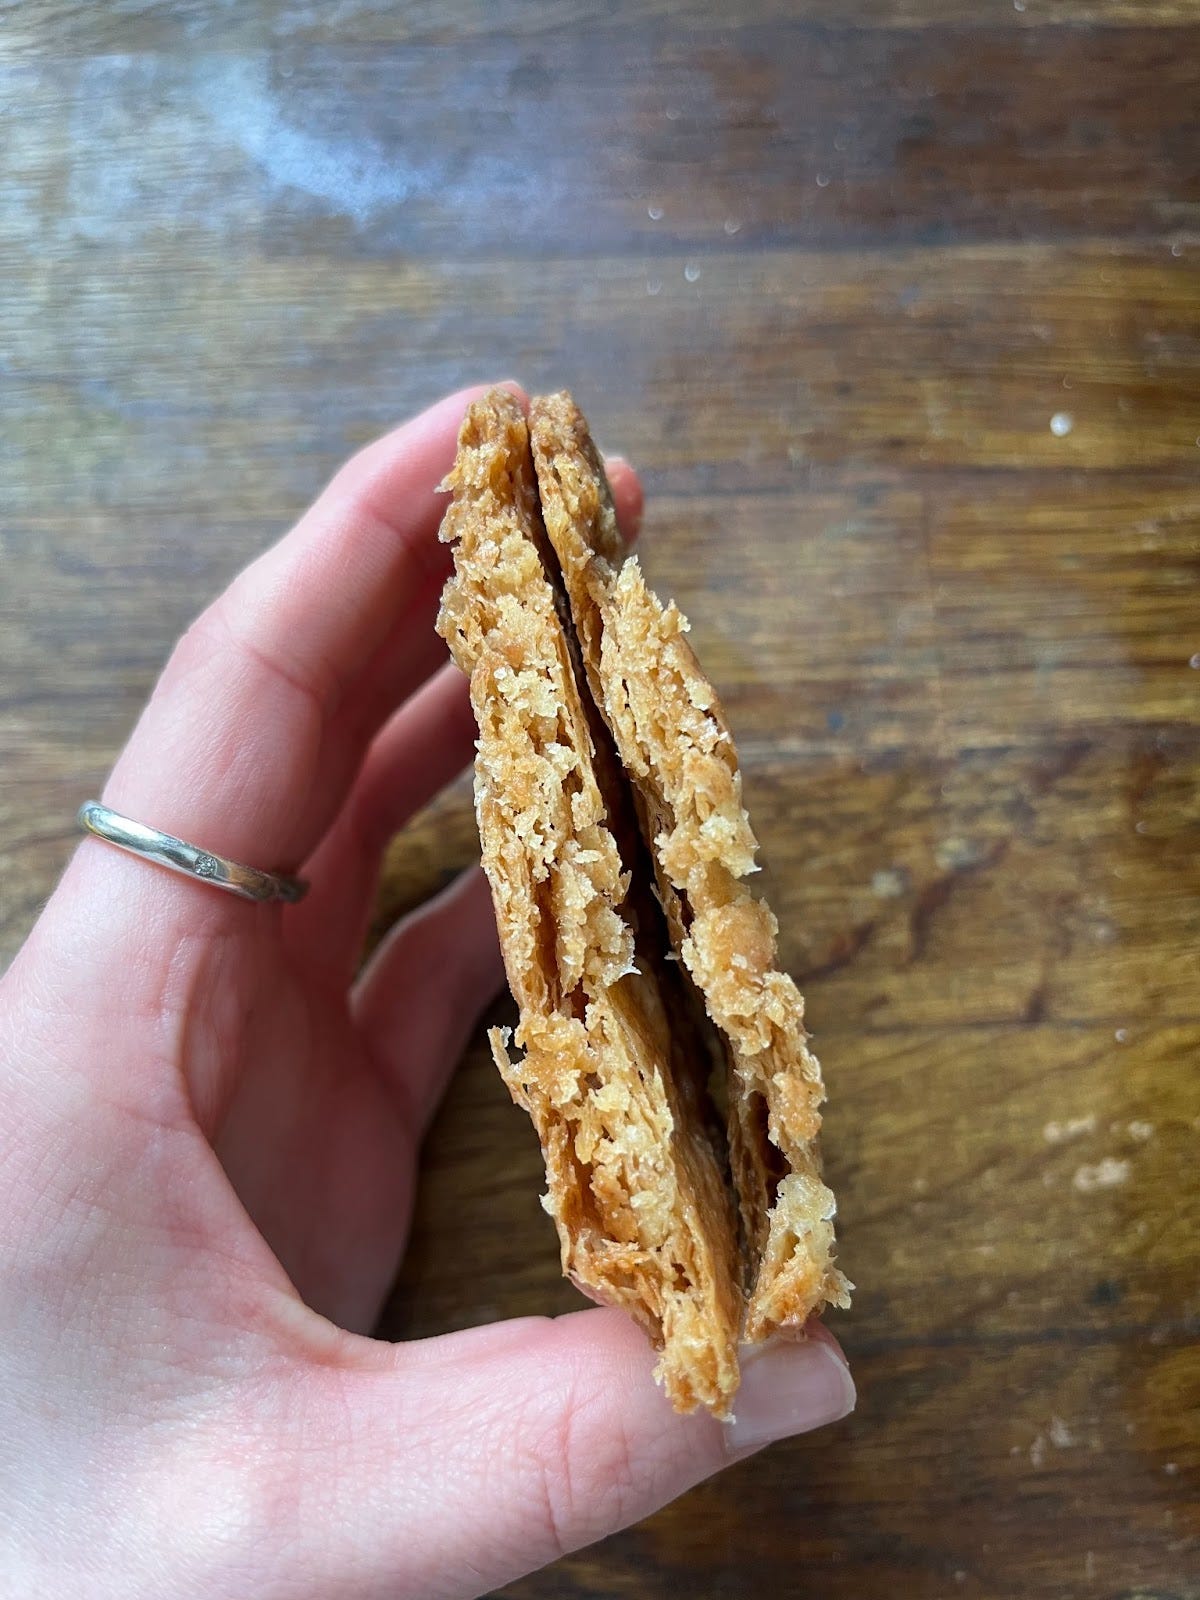
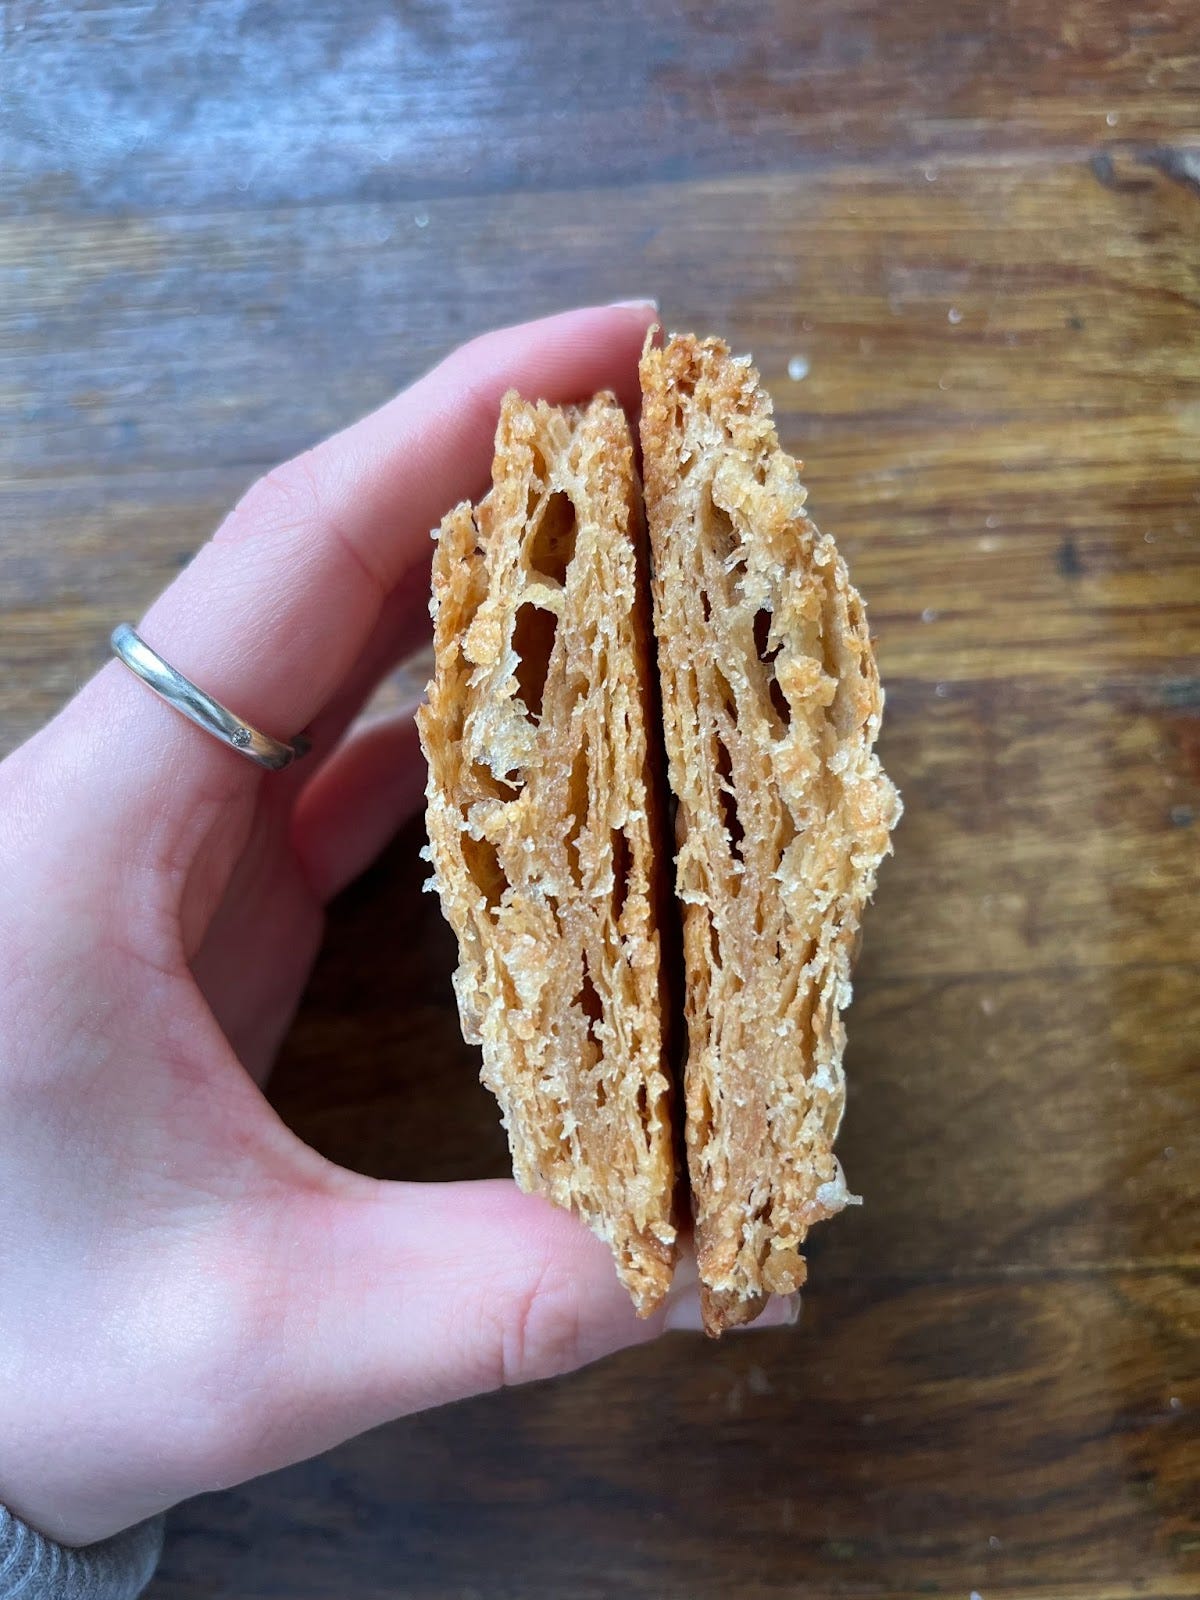
You can see from the images that the non laminated dough has a slightly tighter structure and the laminated dough is slightly underbaked but has larger air pockets. I found that the 15% increase in hydration was actually too much. The more liquid meant the gluten had formed more bonds making it quite tough.
For my final bake, I settled on a 44% hydration.
Brown Butter & Spelt Cherry Pie
As March and April are weird in between months for fruit here in Ireland, I hit up the freezer section to inject my pie with some hopeful Summer sun! For this recipe you can of course swap out the cherries for any other fruit (fresh or frozen).
Please note this recipe is for 4 people but by all means scale it up.
Brown Butter
225g (or 1 packet) unsalted butter (yield 190g brown butter)
Method
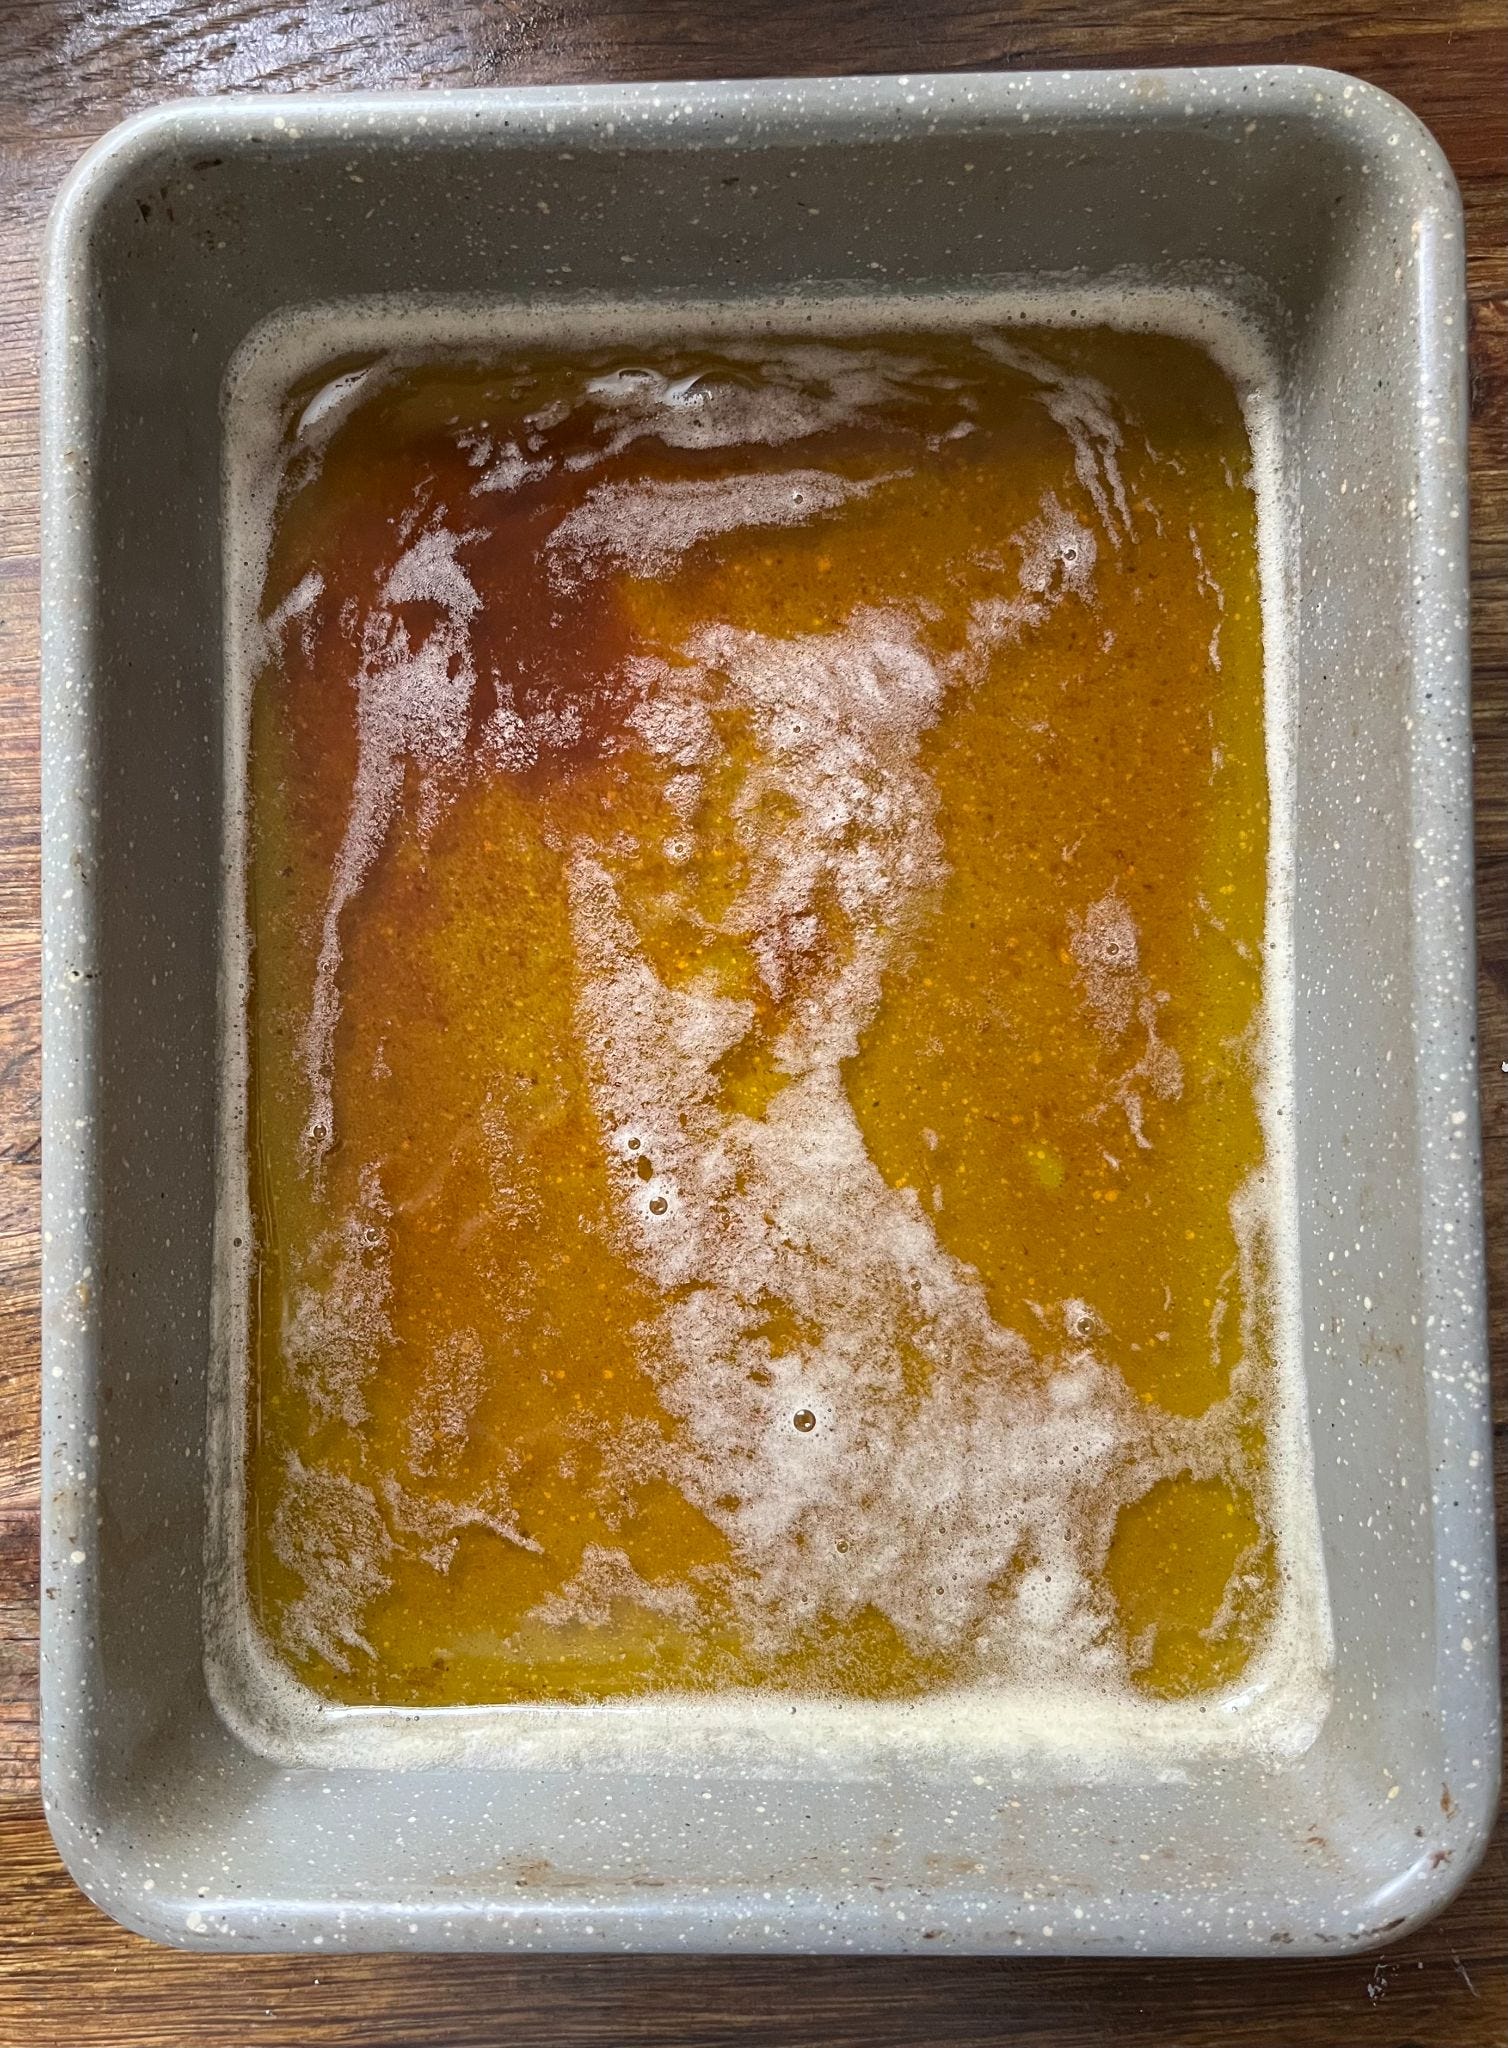
Roughly chop the butter and place in a high sided saucepan over a medium heat. Stir every minute or so to ensure even browning.
After 5 mins the butter will begin to foam and smell like digestive biscuits. Continue to cook for another few mins until caramel in colour. Pour through a metal sieve (do not use plastic it will melt) into a heatproof bowl or tray.
Allow to cool at room temp before transferring to the fridge for 2 or more hours.
Brown Butter & Spelt Pie Dough
Makes a 20cm rectangle pie dish (for 4).
135g brown butter
35g plain flour
140g spelt flour
15g caster sugar
3g fine sea salt
75-77g ice cold water
Method
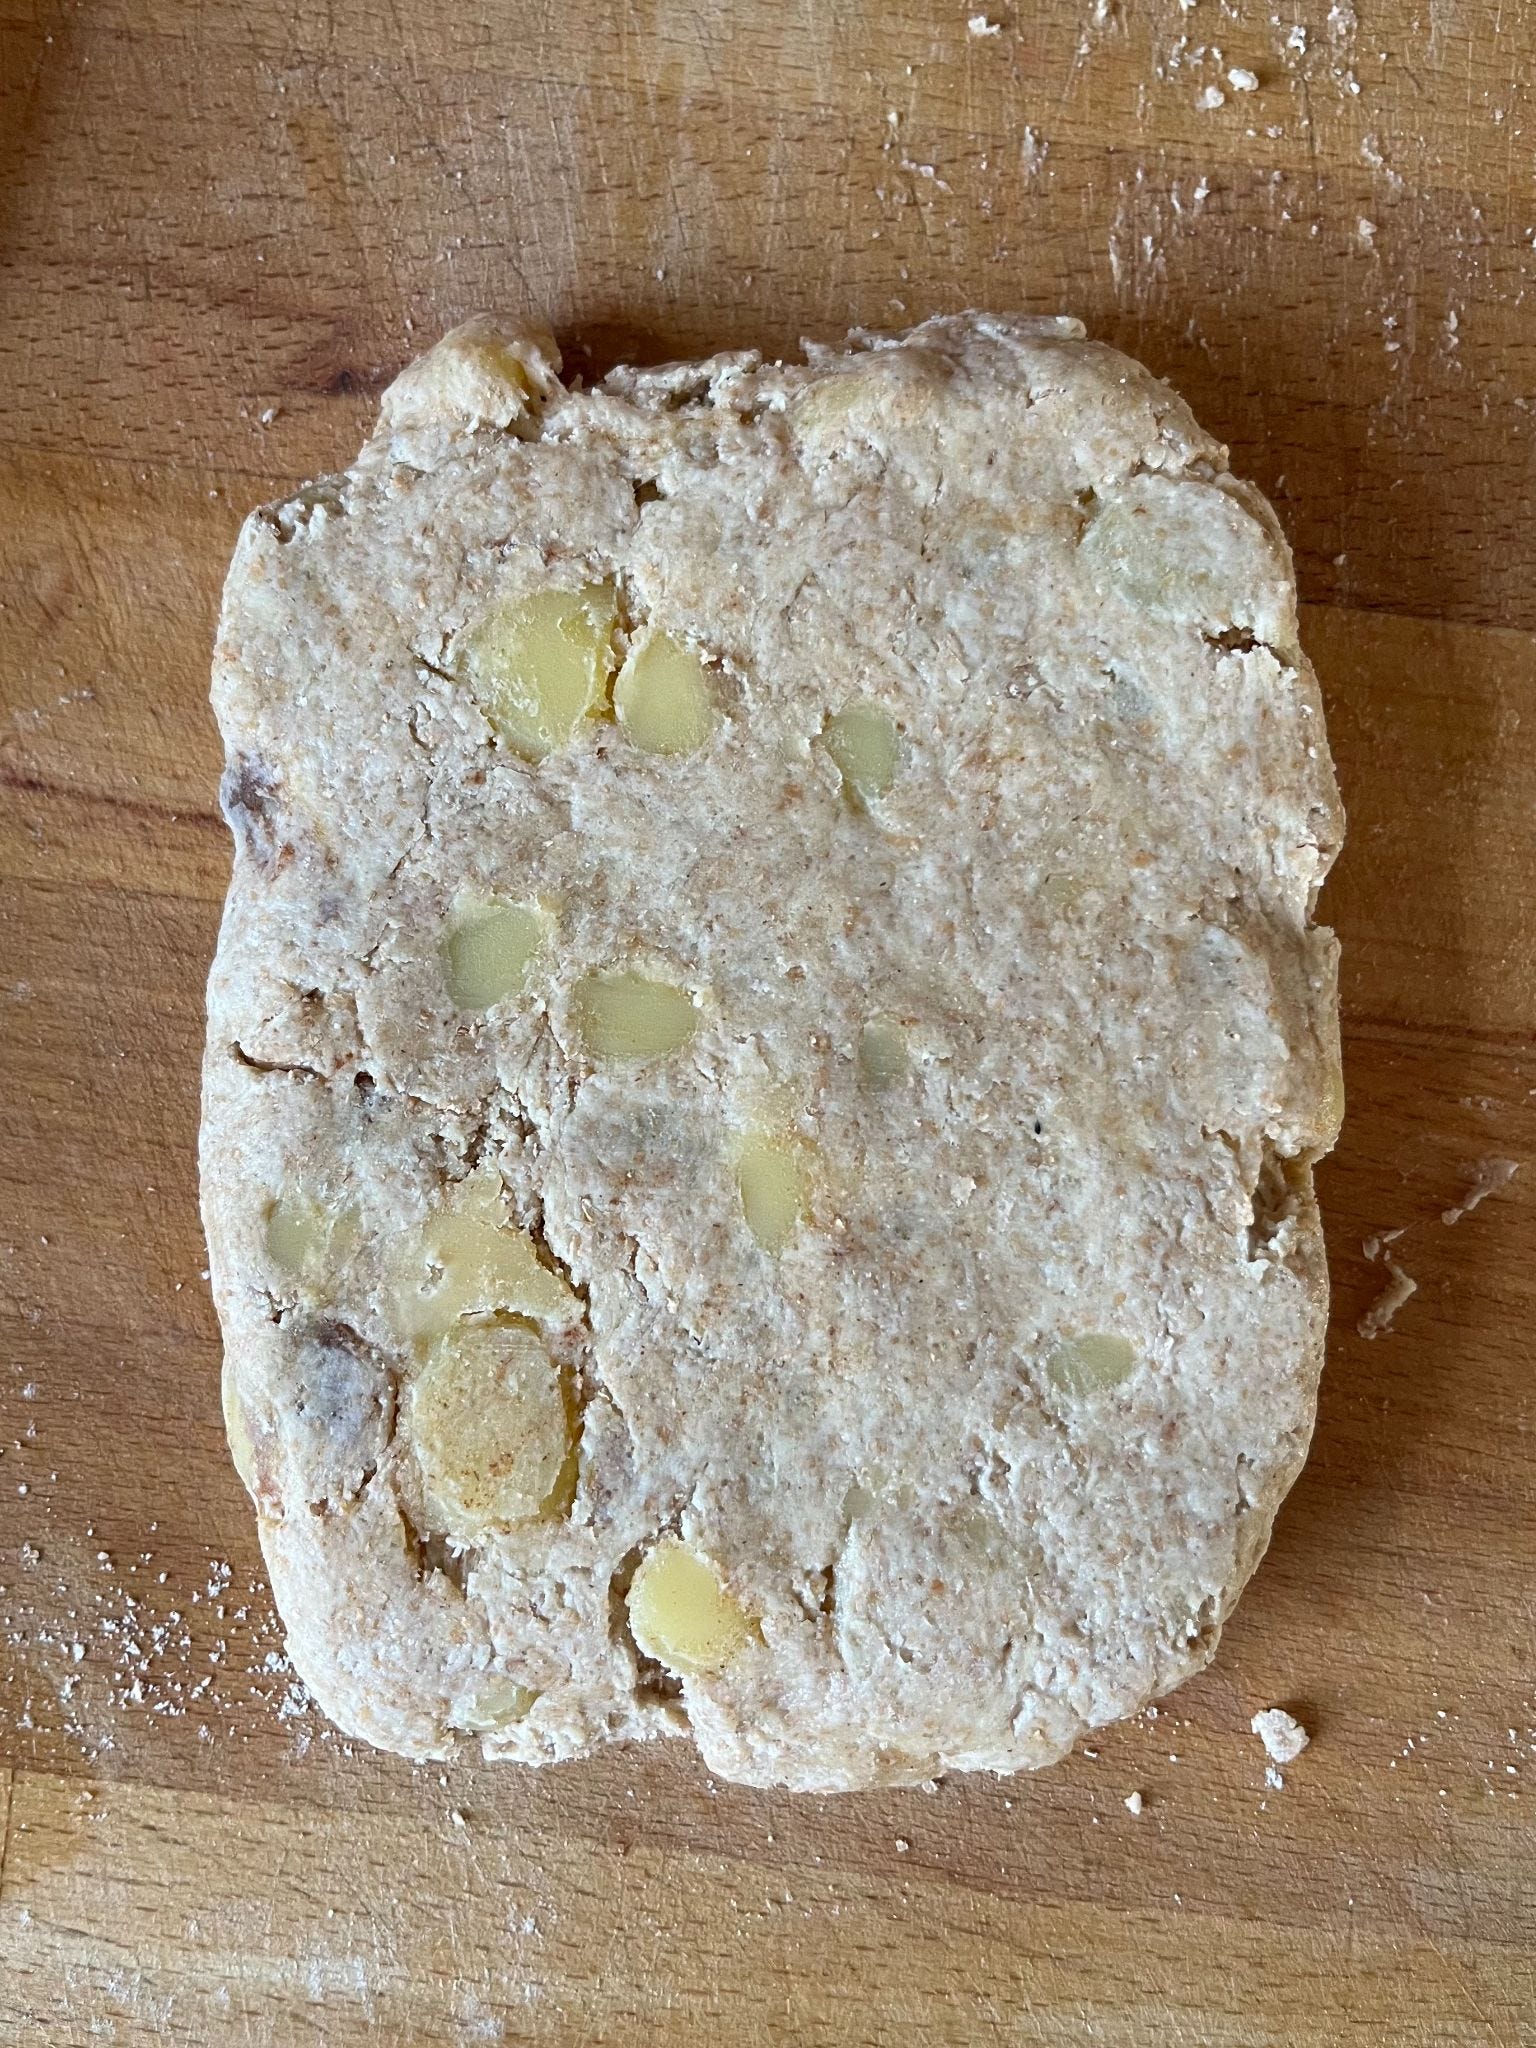
Remove the brown butter from the fridge and cut into small cubes.
Weigh the brown butter, plain flour, spelt flour, caster sugar and salt into a medium sized bowl.
With your fingers rub the butter chunks into the dry ingredients until it resembles coarse breadcrumbs with a few larger chunks of butter remaining. If the mix feels warm at any point, return to the fridge for 5 mins or so.
With one hand continuing to mix the dough, use the other to slowly pour in the ice cold water in a steady stream.
Mix until the ingredients have formed a dough and there are no more visible dry patches of flour.
On a clean work surface tip the dough out and form into a 1” thick rectangle. Cling wrap (or keep in a sandwich bag) and refrigerate for a minimum of 4 hours. This rest period is important as it allows the butter to resolidify and for the gluten to relax and hydrate. If you rush this, the dough might resist being rolled out and you’ll get some shrinkage during the bake.

After 4 hours (or overnight), remove the dough from the fridge.
Lightly flour your work surface and both sides of the dough.
Roll the dough out lengthways to around 4mm thick. Fold the dough into three equal parts as if you were folding a letter, this is also known as a single fold. (See image below).
A quick note - if the dough is on the crumbly side, that’s ok! The brown butter is firmer than regular butter, so will naturally resist being rolled out. Squash any loose pieces back in and let it sit for a few mins to temper before continuing.
Repeat the above roll and fold.
Repeat the above.

Single Fold
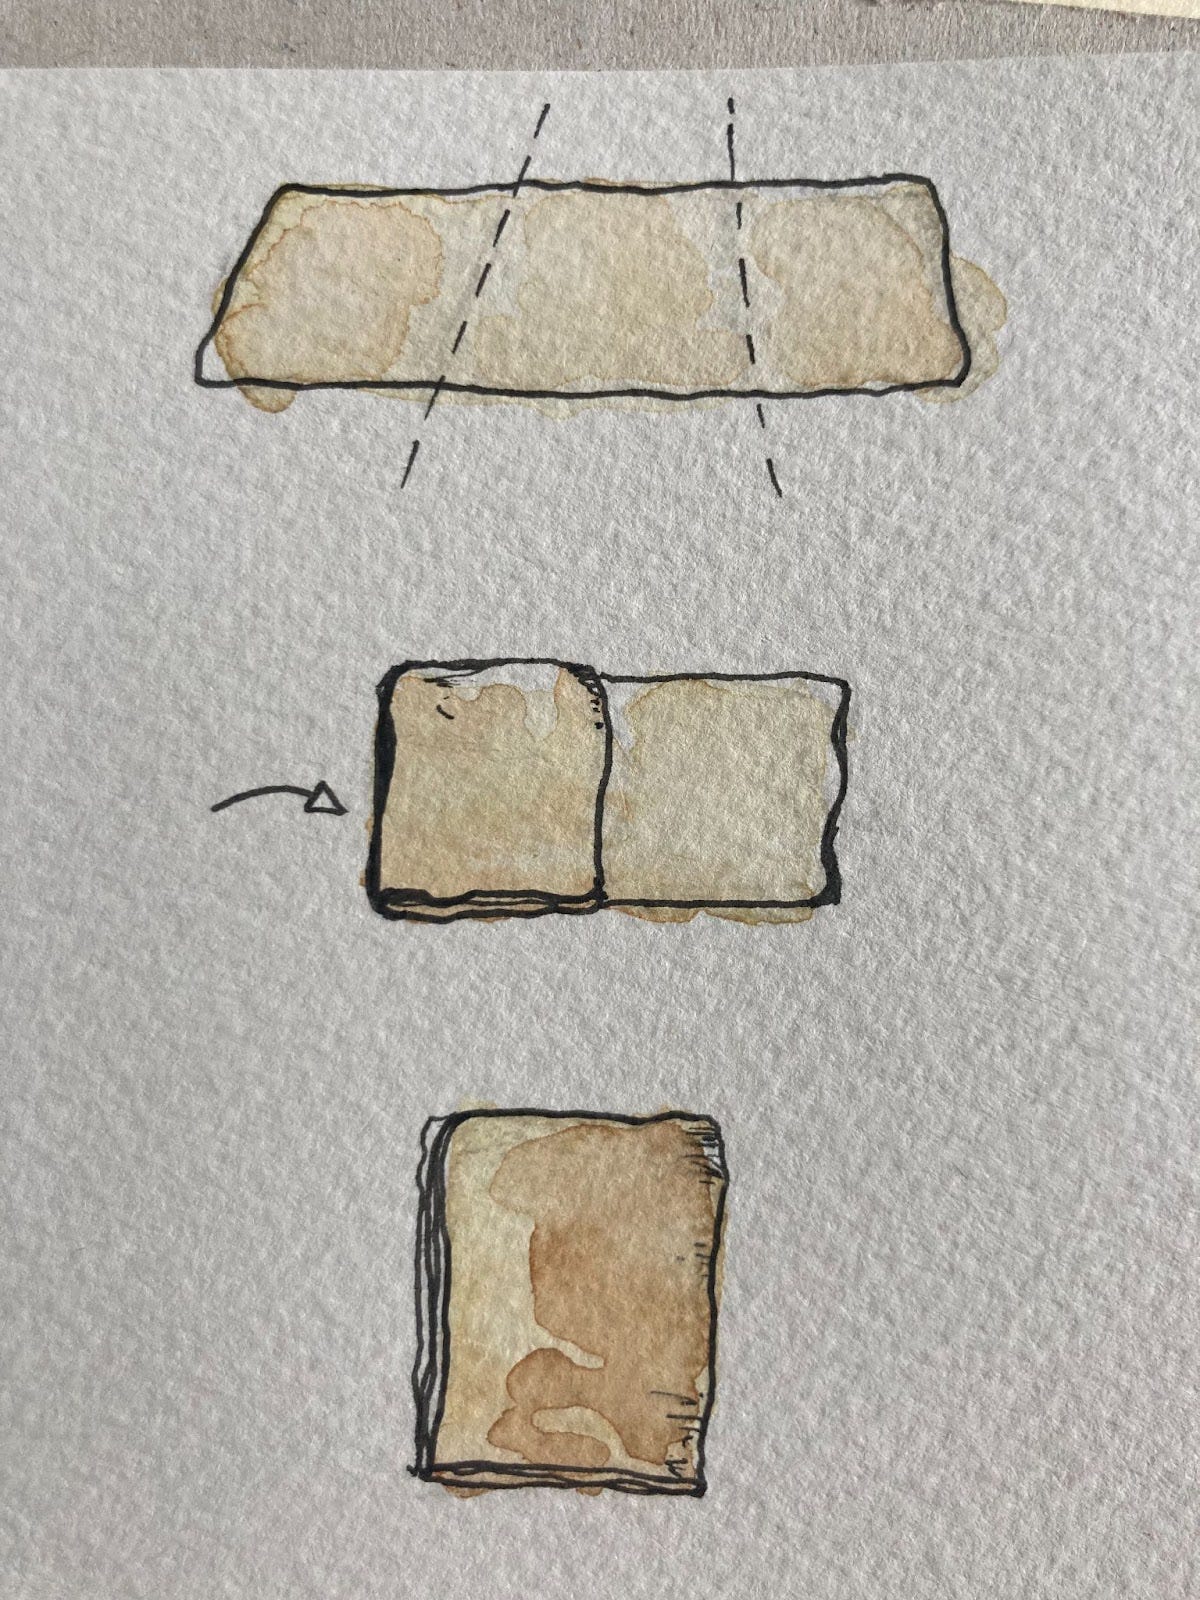
Now you have performed 3 x single folds, your butter chunks should look marbled through your dough.
Cling wrap and return to the fridge for 30-60 mins.
Once chilled, remove from the fridge and cut off one-third and set aside (this is for the lid).
Roll out the remaining two-thirds of dough to around 3-4mm thick. If you roll too thin here the fruit juices are going to seep into the dough whilst cooking, making for a sog city bottom - a sad mistake I’ve made!
Lightly grease your pie tin, then lay the dough inside, making sure to push it into all corners. Trim any excess with scissors but leave around 1” overhang. Save any spare dough for a special re-rolled chef’s treat (see below). Put the lined tin in the fridge whilst you prepare the top.
Roll the remaining dough out to 3-4mm thick, either keeping it whole or cutting strips for a lattice. If cutting strips, cut them around 1.5” wide. Chill these on a sheet tray lined with parchment whilst you prepare the filling.
Cherry Filling & Assembly
300g frozen cherries (or other fruit)
75g caster sugar
5g plain flour
2g fine sea salt
½ vanilla pod, seeds scraped
½ orange, zested
15ml Amaretto (optional)
For brushing
1 egg, beaten
1tbsp, demerara sugar (optional)
Method
Add all ingredients to a medium sized bowl and stir to combine. I like to work with the cherries still frozen. As soon as they thaw they are going to start leaching lots of juices which can make the pie assembly a bit tricky.
Remove the lined pie case from the fridge and fill it with the cherry mix. It will look like there is too much but it’s going to cook down so trust the process.
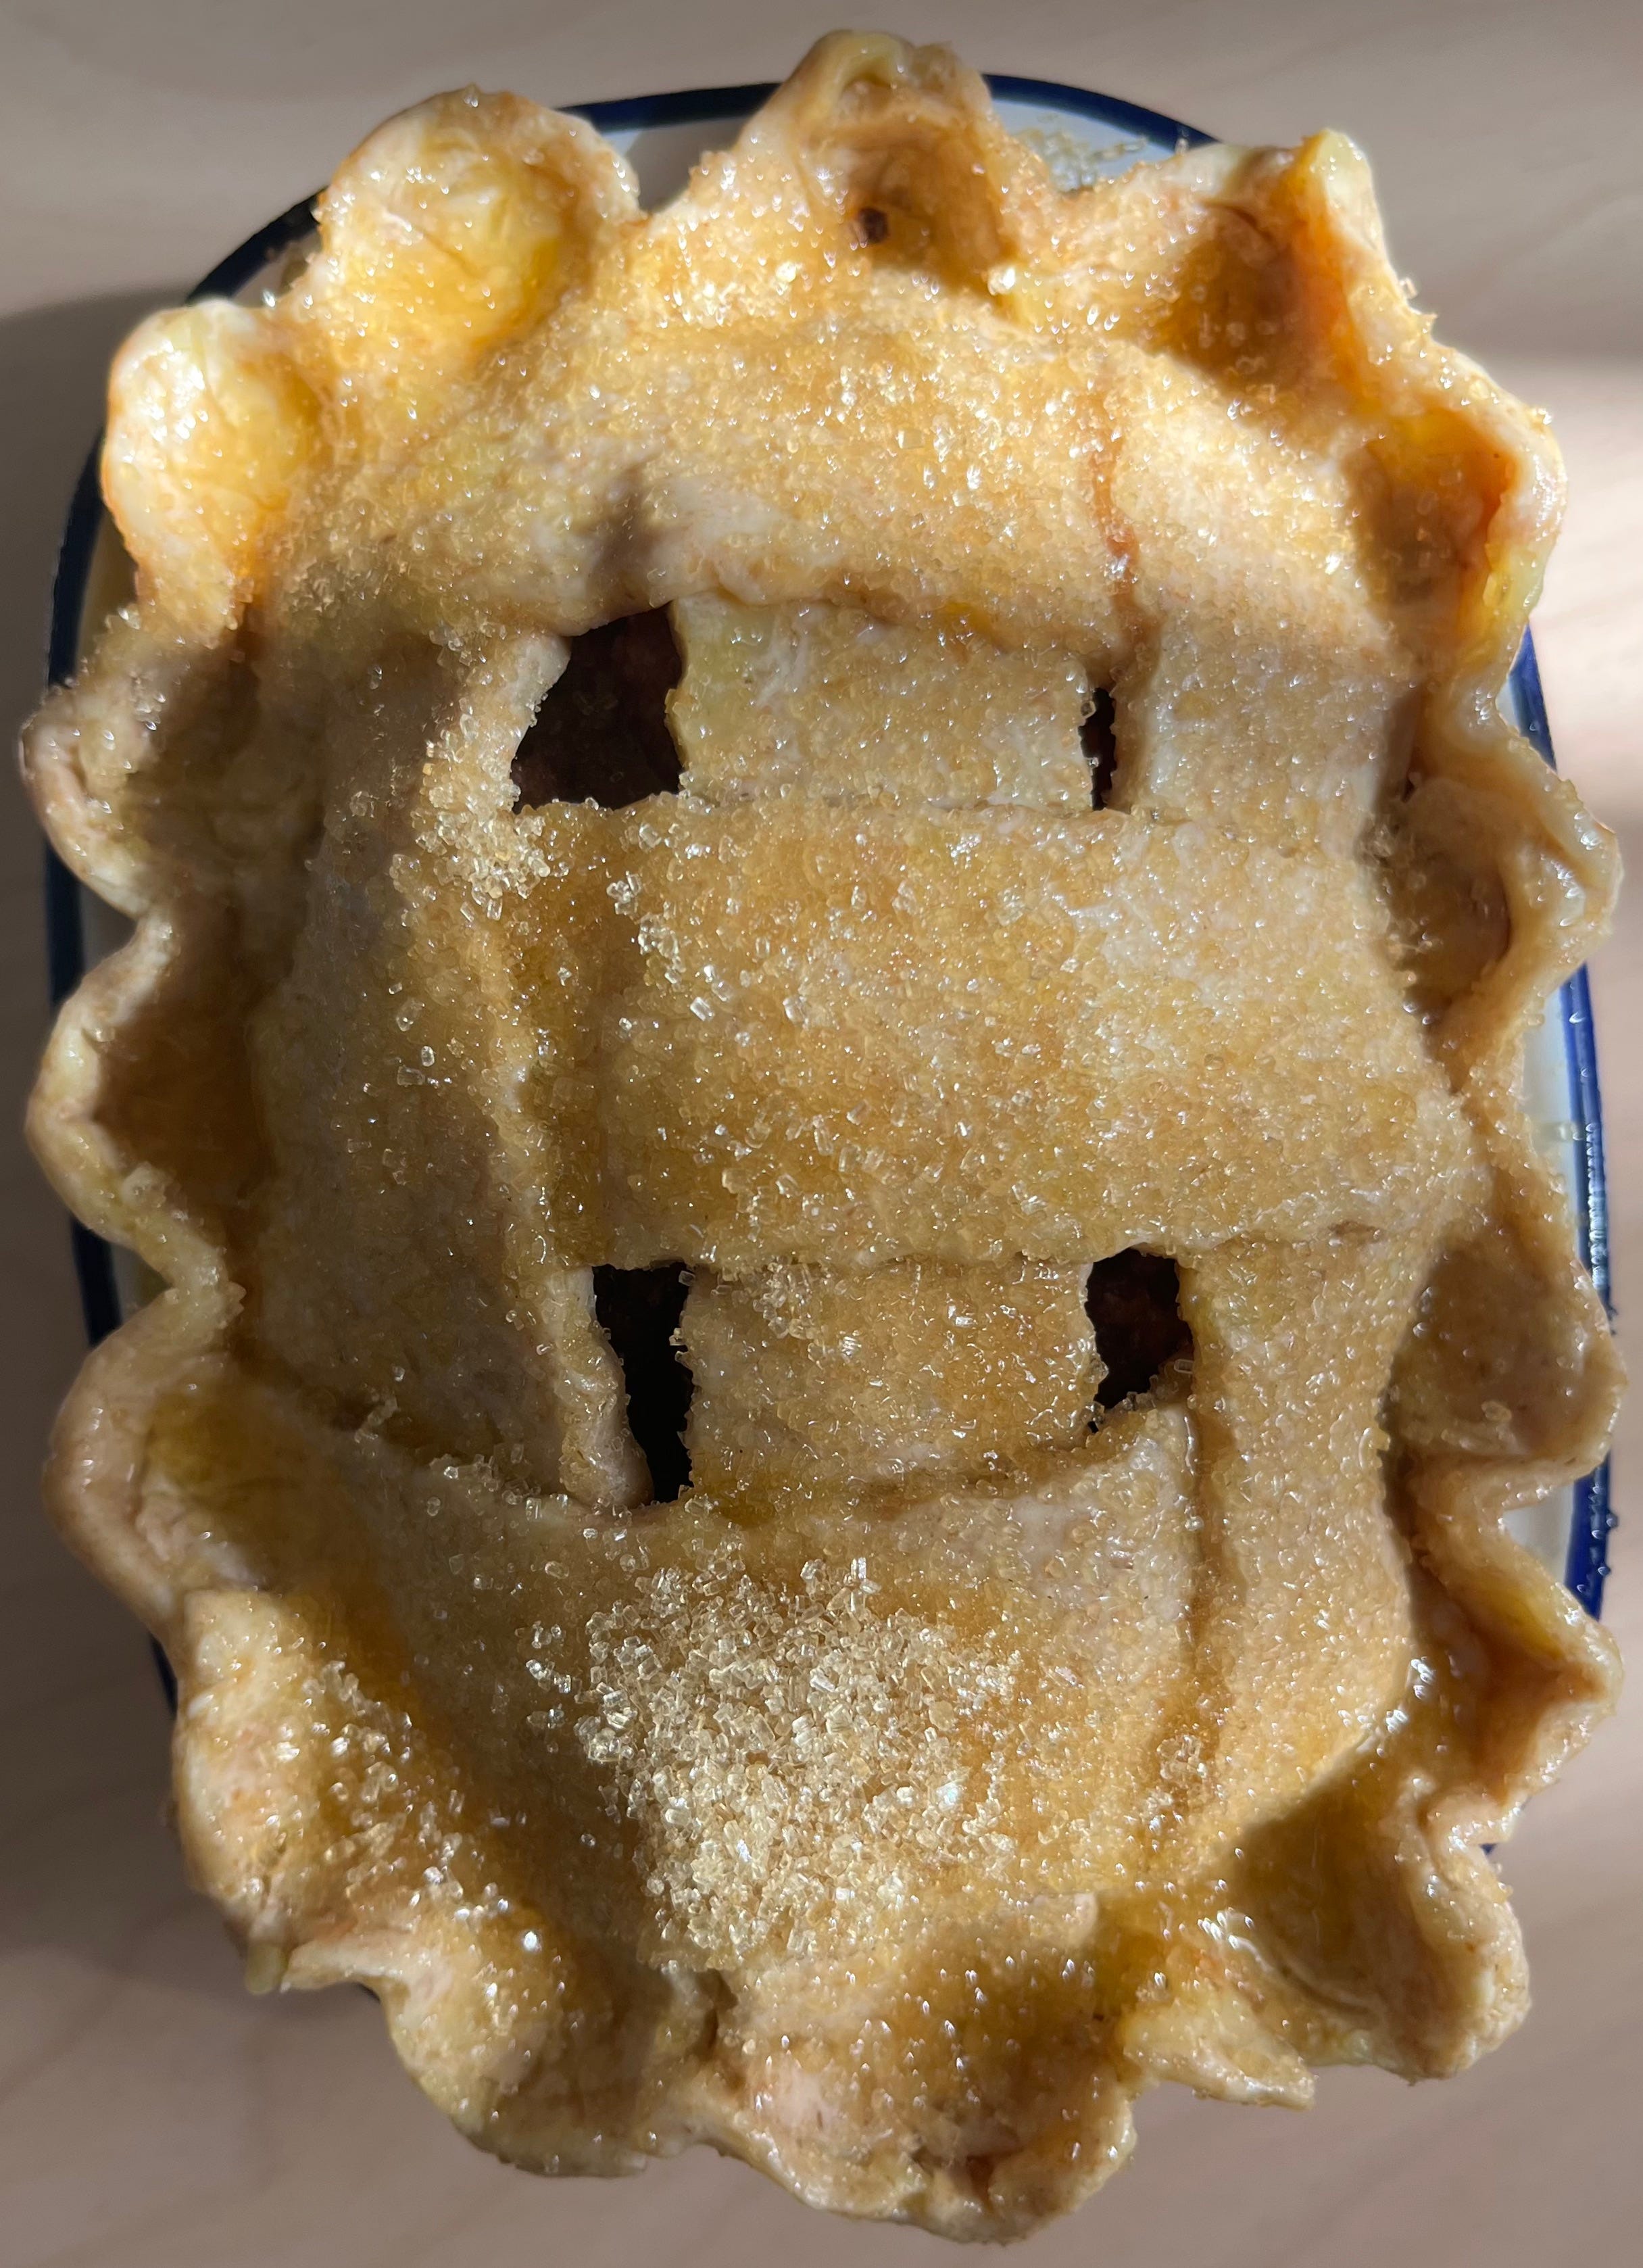
Top with the whole lid or weave the pastry strips into a lattice pattern. Seal by pinching together the edges of the base and the lid. It doesn’t have to look perfect, it’s gonna taste delish so try not to get too caught up on the design.
Return to the fridge for 30-60 mins or freezer for 15-30 mins.
Place a pizza stone or cast iron pan in the oven and preheat to 220C fan. (The high heat helps the dough to puff). If you don’t have either, that’s ok! The stone just helps evenly cook the bottom of your pie. Alternatively, use a baking sheet to catch all the buttery, fruity juices.
Once chilled, egg wash the top of the pie. Sprinkle liberally with demerara sugar.
Place the pie on top of the hot stone and bake for 10 mins then drop the oven down to 180C fan and bake for a further 50-60 mins. If the pie is colouring too quickly, cover with foil half way through. If it looks like it could take a bit longer, keep baking for another 10-20 mins.
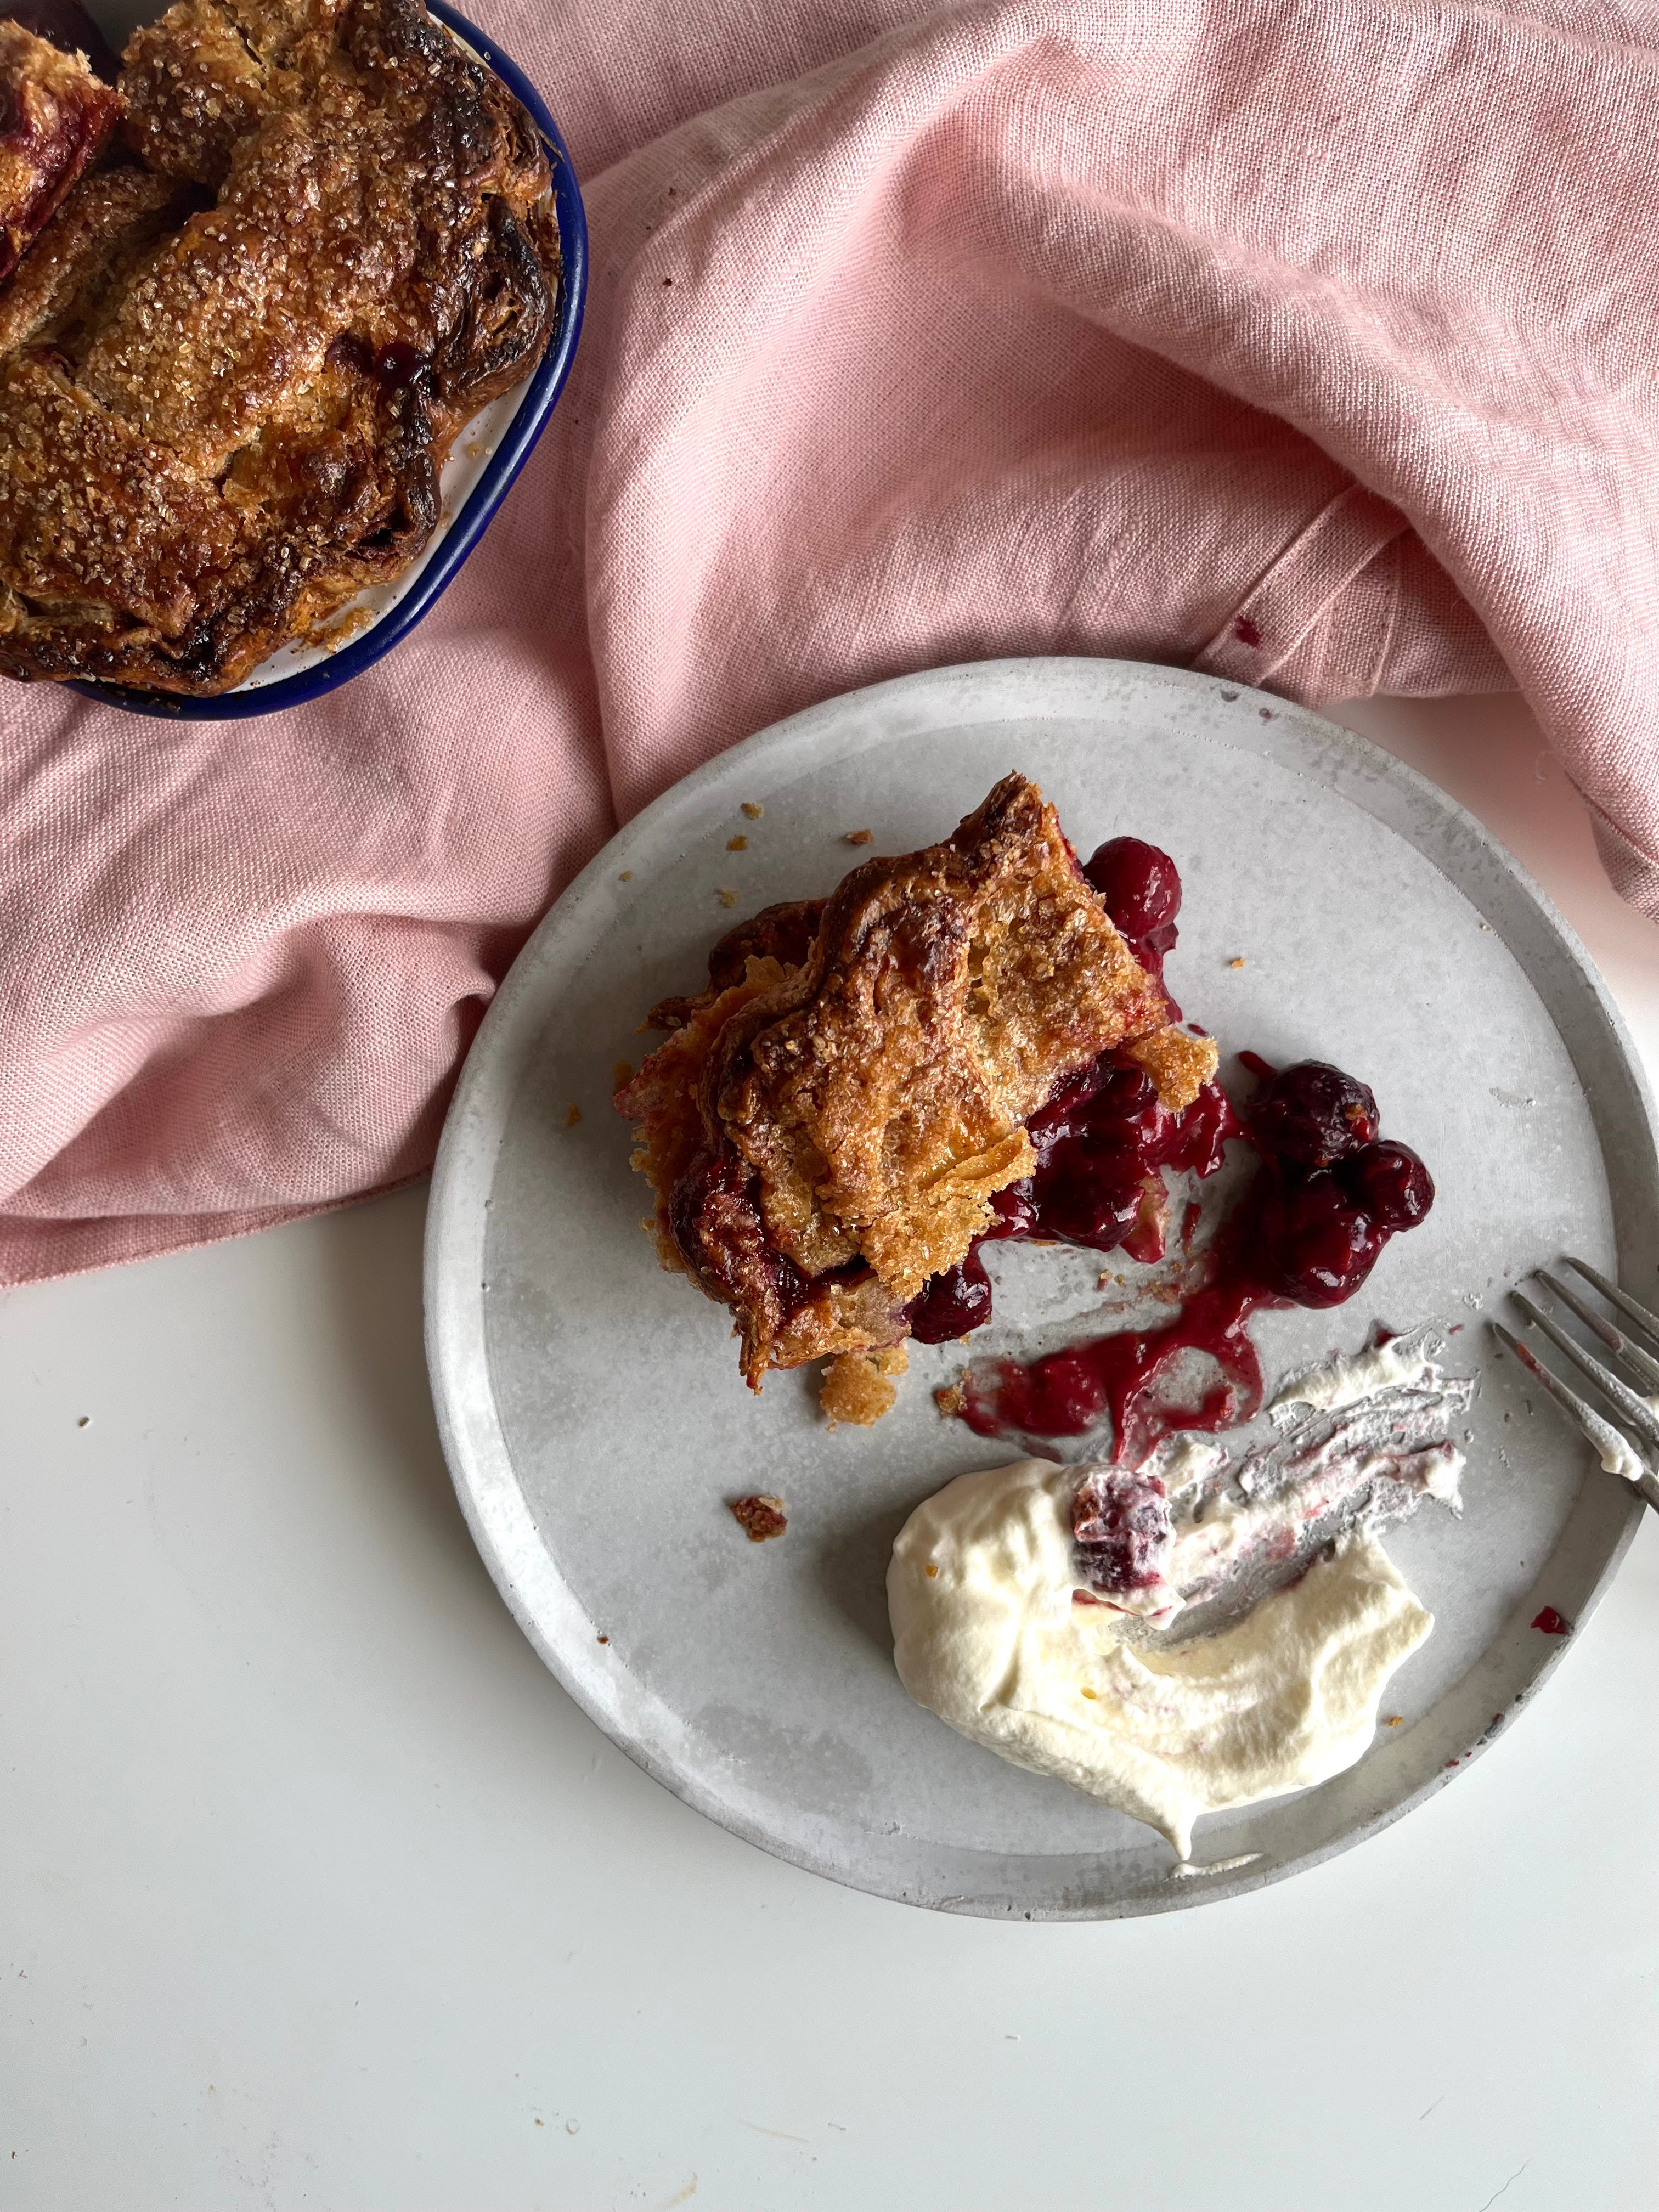
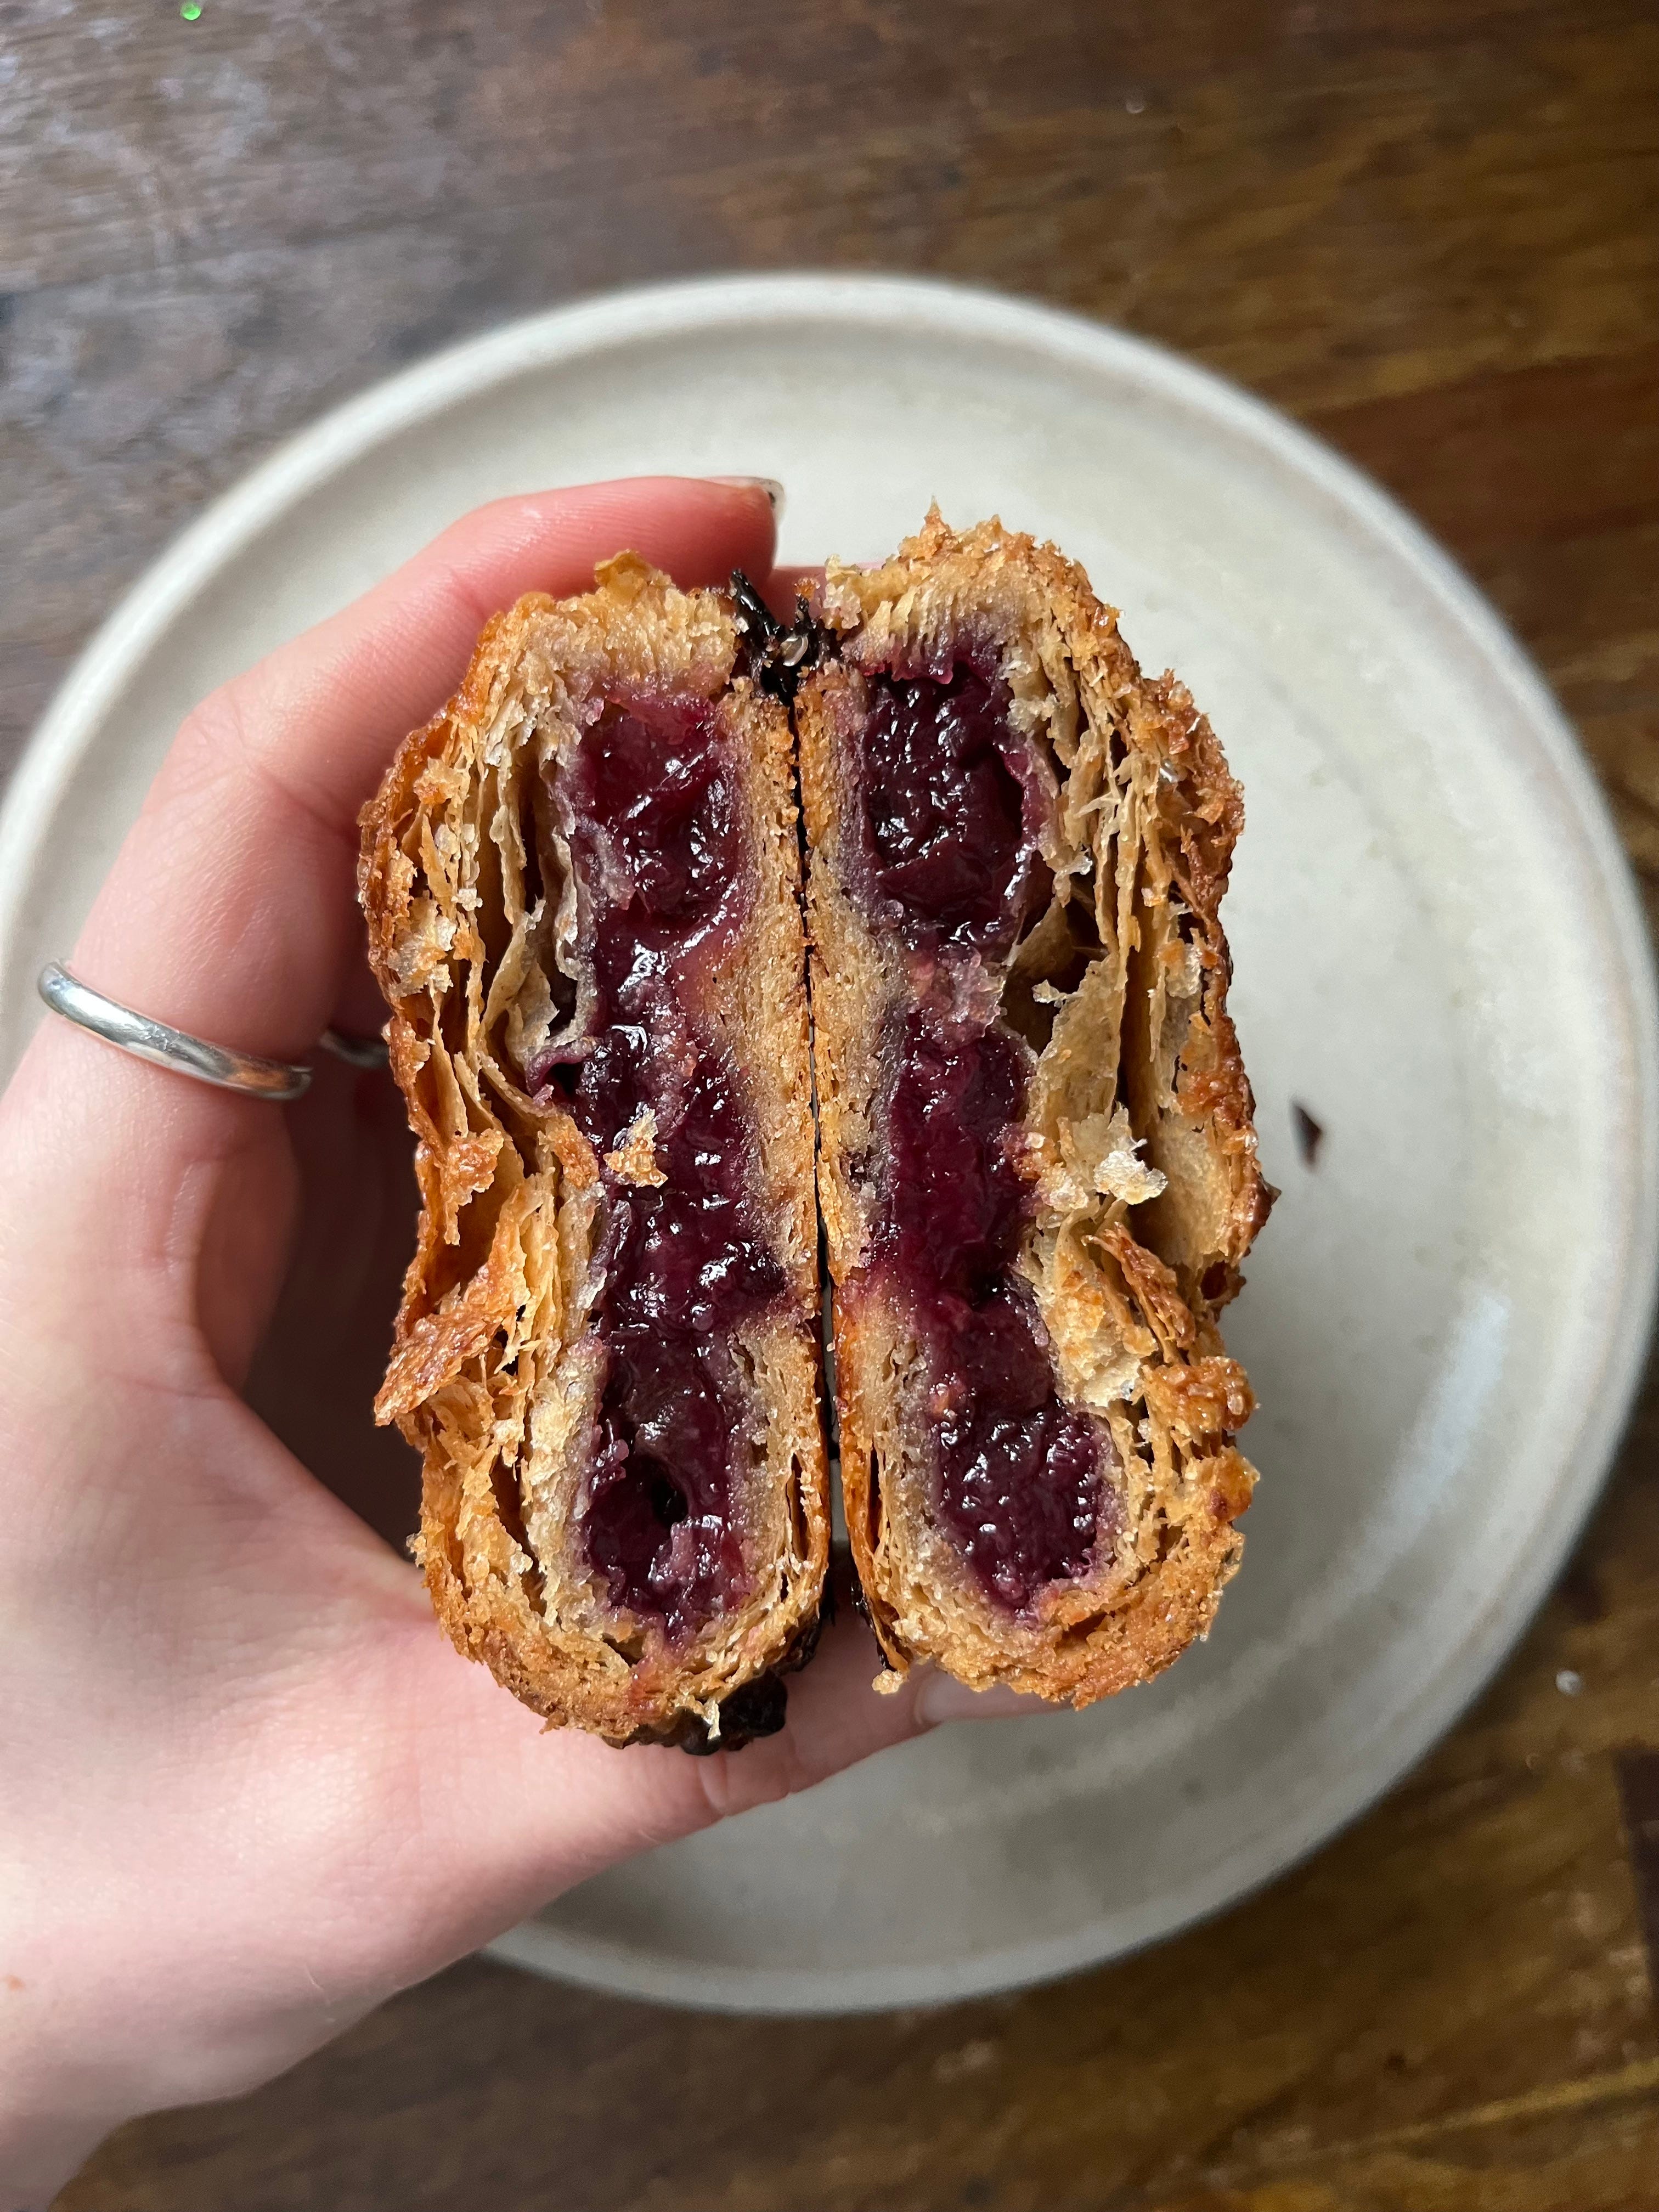
As tempting as it is, this pie is best left to cool for at least 2hrs before digging in. Don’t be disheartened, the first slice is always the hardest to release.
Serve with cream, custard or ice cream.
Scraps
I hate waste, so re-rolling pie dough is my jam. Save any trimmings you have, squash them back together and re-roll them out to make a cute lil hand pie for a chef’s treat. The gluten bonds are going to strengthen the more you re-roll so it won’t be as delicate as the first but I won’t tell if you don’t.
Wow never knew this method before!! Can’t wait to test this recipe out! Great work Cissy ✨
hi, is there a reason for not wanting the milk solid bits in the final butter?? or could i skip the straining and just use the brown butter as is?? (i know you shared a recipe for those caramelized bits, but i was wondering if they wouldn't make for an extra nutty crust)